


AlmaLinuxの標準nginxでHTTP/3(QUIC)を有効化する最小構成|Let’s Encrypt対応
こんにちは。技術部のtuouraです。
以前、Ubuntu Server 16.04 と Let’s Encrypt を使って「お手軽に HTTP/2 対応の WEB サーバーを作る」という記事を書かせていただきましたが、今回はその進化形とも言える HTTP/3 についてお話ししようと思います。
少し前までは、特定のレポジトリから導入した Nginx でないと HTTP/3 対応は難しかったのですが、いつのまにか RHEL 系のデフォルトパッケージでも利用できるようになっていました。まさに「時代の進化」ですね。
必要な構成を確認する
以下の検証環境を用意しました。
- サーバーOS: AlmaLinux 10(最新の RHEL 系 OS をチョイスしました)
- ドメイン: 正引き可能なドメイン名(SSL 証明書の取得に必須です)
またHTTP/3はUDPポートの443を使う為、ファイアウォール/パケットフィルタは、以下のポートを解放しておきます。
- TCPポート:80/443
- UDPポート:443
パッケージの導入
まずは OS 標準のレポジトリ(appstream)から Nginx を導入します。
# dnf install nginx
Last metadata expiration check: 1:55:02 ago on Mon 02 Mar 2026 06:52:53 PM JST.
Dependencies resolved.
=========================================================================================================================================
 Package                              Architecture               Version                             Repository                     Size
=========================================================================================================================================
Installing:
 nginx                                x86_64                     2:1.26.3-1.el10                     appstream                      36 k
Installing dependencies:
 nginx-core                           x86_64                     2:1.26.3-1.el10                     appstream                     659 k
 nginx-filesystem                     noarch                     2:1.26.3-1.el10                     appstream                      11 k

Transaction Summary
=========================================================================================================================================
Install  3 Packages

Total download size: 707 k
Installed size: 1.9 M
Is this ok [y/N]: y
~略

Installed:
  nginx-2:1.26.3-1.el10.x86_64            nginx-core-2:1.26.3-1.el10.x86_64            nginx-filesystem-2:1.26.3-1.el10.noarch

Complete!
導入後、nginx -V でnginxのconfigureオプションを確認します。
[–with-http_v3_module]が含まれているので、HTTP/3が利用可能な事が確認出来ます。
# nginx -V
nginx version: nginx/1.26.3
built with OpenSSL 3.2.2 4 Jun 2024 (running with OpenSSL 3.5.1 1 Jul 2025)
TLS SNI support enabled
configure arguments: --prefix=/usr/share/nginx --sbin-path=/usr/sbin/nginx --modules-path=/usr/lib64/nginx/modules --conf-path=/etc/nginx/nginx.conf --error-log-path=/var/log/nginx/error.log --http-log-path=/var/log/nginx/access.log --http-client-body-temp-path=/var/lib/nginx/tmp/client_body --http-proxy-temp-path=/var/lib/nginx/tmp/proxy --http-fastcgi-temp-path=/var/lib/nginx/tmp/fastcgi --http-uwsgi-temp-path=/var/lib/nginx/tmp/uwsgi --http-scgi-temp-path=/var/lib/nginx/tmp/scgi --pid-path=/run/nginx.pid --lock-path=/run/lock/subsys/nginx --user=nginx --group=nginx --with-compat --with-debug --with-file-aio --with-http_addition_module --with-http_auth_request_module --with-http_dav_module --with-http_degradation_module --with-http_flv_module --with-http_gunzip_module --with-http_gzip_static_module --with-http_image_filter_module=dynamic --with-http_mp4_module --with-http_perl_module=dynamic --with-http_random_index_module --with-http_realip_module --with-http_secure_link_module --with-http_slice_module --with-http_ssl_module --with-http_stub_status_module --with-http_sub_module --with-http_v2_module --with-http_v3_module --with-http_xslt_module=dynamic --with-mail=dynamic --with-mail_ssl_module --with-openssl-opt=enable-ktls --without-engine --with-pcre --with-pcre-jit --with-stream=dynamic --with-stream_realip_module --with-stream_ssl_module --with-stream_ssl_preread_module --with-threads --with-cc-opt='-O2 -flto=auto -ffat-lto-objects -fexceptions -g -grecord-gcc-switches -pipe -Wall -Wno-complain-wrong-lang -Werror=format-security -Wp,-U_FORTIFY_SOURCE,-D_FORTIFY_SOURCE=3 -Wp,-D_GLIBCXX_ASSERTIONS -specs=/usr/lib/rpm/redhat/redhat-hardened-cc1 -fstack-protector-strong -specs=/usr/lib/rpm/redhat/redhat-annobin-cc1 -m64 -march=x86-64-v3 -mtune=generic -fasynchronous-unwind-tables -fstack-clash-protection -fcf-protection -mtls-dialect=gnu2 -fno-omit-frame-pointer -mno-omit-leaf-frame-pointer' --with-ld-opt='-Wl,-z,relro -Wl,--as-needed -Wl,-z,pack-relative-relocs -Wl,-z,now -specs=/usr/lib/rpm/redhat/redhat-hardened-ld -specs=/usr/lib/rpm/redhat/redhat-annobin-cc1 -Wl,--build-id=sha1 -specs=/usr/lib/rpm/redhat/redhat-package-notes -Wl,-E -O2'
SSL証明書の取得
HTTP/3 には正規の SSL 証明書が欠かせません。以前の記事でも紹介した通り、Let’s Encrypt を活用して無料で取得していきましょう。 今回は EPEL レポジトリから Certbot を導入します。
# dnf install epel-release
# dnf install certbot
取得の詳細は、弊社の以前のブログ記事「Let’s Encryptで無料SSL設定」も参考にしてみてください。
# certbot certonly --standalone -d ドメイン名
# ls -l /etc/letsencrypt/live/
total 8
-rw-r--r-- 1 root root 740 Feb 6 19:31 README
drwxr-xr-x 2 root root 4096 Feb 6 19:31 ドメイン名

# ls -l /etc/letsencrypt/live/ドメイン名/
total 4
lrwxrwxrwx 1 root root  38 Feb  6 19:31 cert.pem -> ../../archive/ドメイン名/cert1.pem
lrwxrwxrwx 1 root root  39 Feb  6 19:31 chain.pem -> ../../archive/ドメイン名/chain1.pem
lrwxrwxrwx 1 root root  43 Feb  6 19:31 fullchain.pem -> ../../archive/ドメイン名/fullchain1.pem
lrwxrwxrwx 1 root root  41 Feb  6 19:31 privkey.pem -> ../../archive/ドメイン名/privkey1.pem
-rw-r--r-- 1 root root 692 Feb  6 19:31 README
nginxの設定ファイルの作成
HTTP/3 を有効にするための最小構成ファイルを作成します。以前 HTTP/2 の設定で listen 443 ssl http2 と追記したように、今回は quic に関する記述がポイントになります。
locationやrootなどは指定していないので、必要な際は適宜追加をいただければと思います。
# vi /etc/nginx/conf.d/00_ドメイン名.conf
# cat /etc/nginx/conf.d/00_ドメイン名.conf
    server {

        listen 80 ;
        listen [::]:80 ;

        listen 443 ssl ;
        listen [::]:443 ssl ;

        listen 443 quic reuseport ;
        listen [::]:443 quic reuseport ;

        server_name ドメイン名 ;
        http2 on ;
        http3 on ;

        ssl_certificate     /etc/letsencrypt/live/ドメイン名/fullchain.pem ;
        ssl_certificate_key /etc/letsencrypt/live/ドメイン名/privkey.pem ;

        ssl_protocols TLSv1.3 ;

        add_header Alt-Svc 'h3=":443"; ma=86400';

    }
テストを行ってから起動し、UDP ポートで Listen されているか確認します。
# nginx -t
nginx: the configuration file /etc/nginx/nginx.conf syntax is ok
nginx: configuration file /etc/nginx/nginx.conf test is successful

# systemctl start nginx
# ss -tnlu '( sport = 443 or sport = 80 )'
Netid State Recv-Q Send-Q Local Address:Port Peer Address:Port
udp UNCONN 0 0 0.0.0.0:443 0.0.0.0:*
udp UNCONN 0 0 [::]:443 [::]:*
tcp LISTEN 0 511 0.0.0.0:80 0.0.0.0:*
tcp LISTEN 0 511 0.0.0.0:443 0.0.0.0:*
tcp LISTEN 0 511 [::]:80 [::]:*
tcp LISTEN 0 511 [::]:443 [::]:*外部サイトでHTTP/3アクセス確認
続けて外部チェックサイト[http3check.net]でHTTP/3が有効になっているか確認してみましょう。
白いボックスに設定したドメイン名を入れてCHECK!
QUIC is supported / HTTP/3 is supported が表示されたらOKです。
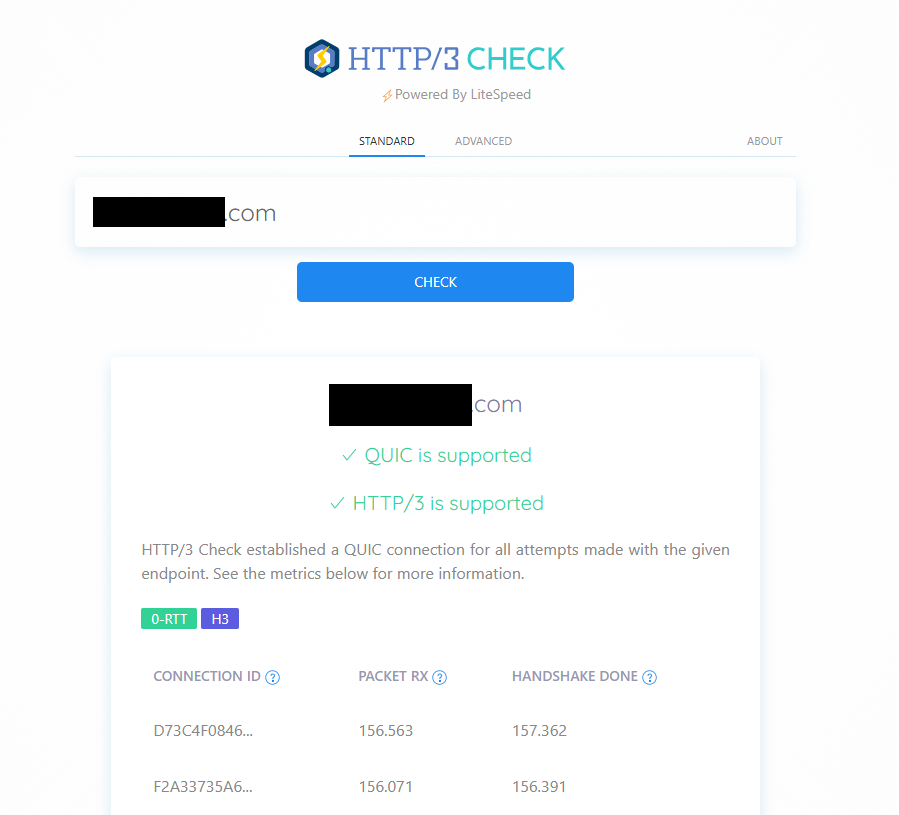
非常に簡単に出来ましたね!
設定の際の忘備録
かなり簡単にまとめましたが、http3check.netでは以下の様なエラーが出て、2時間近く悩みました。
Server does not advertise any alternative services
原因は IPv6 の設定 でした。ドメインに AAAA レコードを設定していたものの、サーバー側で IPv6 が無効なままだったため、チェックサイトが IPv6 経由でアクセスしようとして失敗していたようです。
またIPv6でアクセス出来ない際に、自動的にIPv4でHTTPS/HTTP1.1に切り替わりアクセスしている様で、アクセスログにも記録がある事から、更に原因調査に時間がかかってしまいました。
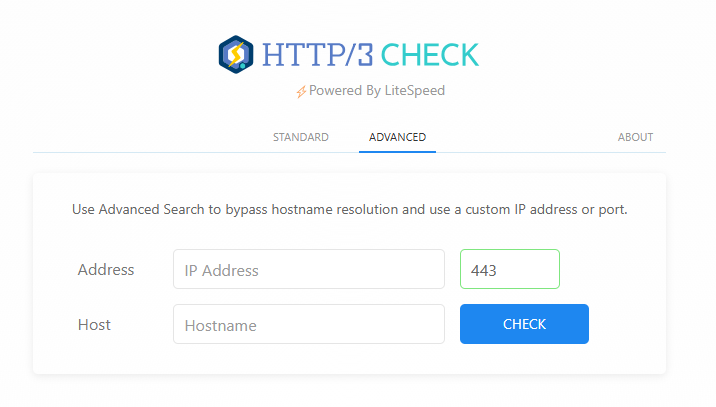
[http3check.net]では、ADVANCEのタブに切り替える事でIPアドレス、ポート番号、ドメイン名を指定できるので、上手くチェックが通らない際は、試してみてください。
最後に
いかがだったでしょうか? Nginx 1.26 系では、驚くほど簡単に HTTP/3 環境が構築できるようになっています。Google が推進する最新プロトコルを導入することは、表示速度の向上だけでなく、将来的な SEO(ページランク)への好影響も期待できるかもしれません。
なお、本記事で紹介した AlmaLinux 10 や Nginx 1.26.3 の詳細な動作仕様については、最新のドキュメントも併せてご確認ください。
最後までお読みいただき、ありがとうございました。