


UbuntuとLet’s Encryptでお手軽HTTP/2
こんにちは。技術部のtuouraと申します。
今回はお手軽にHTTP/2対応のWEBサーバーを作ってみたいと思います。
では早速、作ってみましょう!
1.必要な構成を確認する
まず構築と確認に必要となるものを確認します。
- HTTP/2に対応したhttpデーモン
- ALPN対応のOpenSSL(バージョン1.0.2以上)
- 正引き可能なドメイン名(サブドメインでも可)
- Google Chrome
を用意しておきます。
※今回はIDCFクラウド上の「Ubuntu Server 16.04 LTS 64-bit」テンプレートより「light.S1」にて仮想マシンを作成しました。
※以下、[ドメイン]は自身のドメイン名に置き換えて作業を行って頂ければと思います。
2.サーバーOSの準備
さて、いつもならCentOSで構築するのですが、CentOS7(7.3.1611 (Core))の標準レポジトリではOpenSSL/1.0.1eとなっており、HTTP/2に必要となるALPNに対応していません。
ソースからビルドしてもいいのですが、今回は「簡単に」という所で、OpenSSL/1.0.2gがソースビルド無しで導入可能な、今流行りの「Ubuntu(16.04.1 LTS)」での構築を行います。
まずはOSのアップデートを行います。
# apt-get update # apt-get upgrade # apt-get dist-upgrade # uname -a Linux http2.****** 4.4.0-45-generic #66-Ubuntu SMP Wed Oct 19 14:12:37 UTC 2016 x86_64 x86_64 x86_64 GNU/Linux # reboot # uname -a Linux http2.****** 4.4.0-62-generic #83-Ubuntu SMP Wed Jan 18 14:10:15 UTC 2017 x86_64 x86_64 x86_64 GNU/Linuxアップデートが確認できました。
3.サーバーソフトウェアの導入
続けてOpenSSLを入れましょう!
# apt-get install openssl # openssl version OpenSSL 1.0.2g 1 Mar 2016更にhttpdデーモンを導入します。
一番メジャーなApahceを入れたいところですが、CentOS・Ubunbu、どちらも最新のApacheは導入可能なものの、標準パッケージではHTTP/2のモジュールが有効化されておらず、こちらもHTTP/2を利用する際には、ソースビルド・インストールが必要になります。
nginxであればバージョン1.10以降でHTTP/2に対応しており、Ubuntuでも最新の1.10がパッケージインストールが可能です。ですので、今回はnginxを導入して行きたいと思います。
# apt-get install nginx # nginx -v nginx version: nginx/1.10.0 (Ubuntu) # service nginx start無事Listenしてくれました。
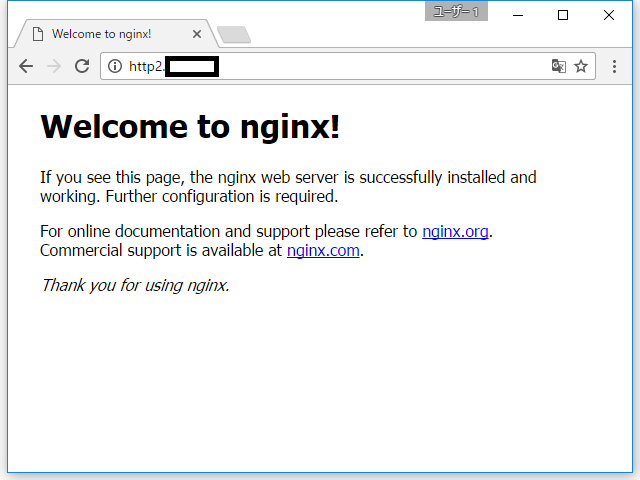
# netstat -ntpl Active Internet connections (only servers) Proto Recv-Q Send-Q Local Address Foreign Address State PID/Program name tcp 0 0 0.0.0.0:80 0.0.0.0:* LISTEN 1359/nginx -g daemo tcp 0 0 0.0.0.0:22 0.0.0.0:* LISTEN 705/sshd tcp 0 0 127.0.0.1:25 0.0.0.0:* LISTEN 889/master tcp6 0 0 :::80 :::* LISTEN 1359/nginx -g daemo tcp6 0 0 :::22 :::* LISTEN 705/sshd tcp6 0 0 ::1:25 :::* LISTEN 889/masterでは、一旦ここでhttp://[ドメイン]/にアクセスしてみましょう。
nginxのデフォルトページが表示されました。
4.nginxの設定
では、続けてnginxのバーチャルホストを設定します。
ドキュメントルートとインデックスページを作ります。
# mkdir /var/www/http2 # echo [ドメイン] > /var/www/http2/index.html # cat /var/www/http2/index.html [ドメイン]バーチャルホストの記述を新規に作成します。
# vi /etc/nginx/conf.d/http2.conf # cat /etc/nginx/conf.d/http2.conf server { listen 80; server_name [ドメイン]; access_log /var/log/nginx/http2.access.log; error_log /var/log/nginx/http2.error.log; location / { root /var/www/http2; index index.html index.htm; } }テストを行い、再起動します。
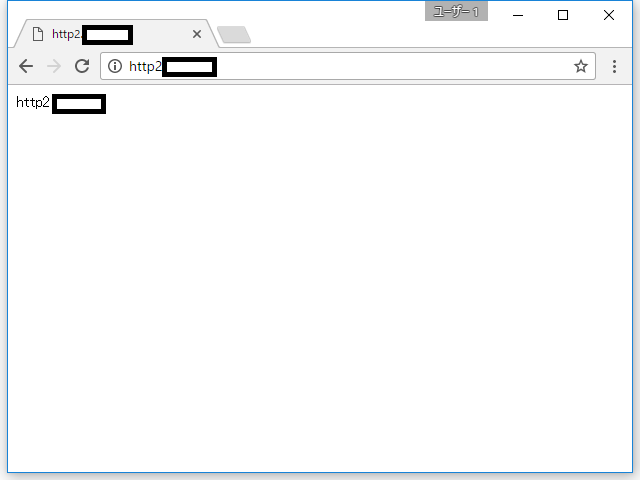
# nginx -t nginx: the configuration file /etc/nginx/nginx.conf syntax is ok nginx: configuration file /etc/nginx/nginx.conf test is successful # service nginx restartではもう一度、http://[ドメイン]/にアクセスをしてみると・・・
先ほどindex.htmlに記入したホスト名が表示されました!5.HTTPプロトコルバージョンの確認
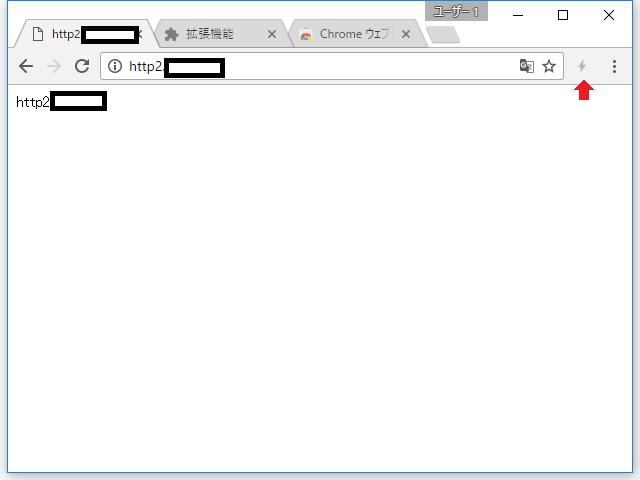
さて、ではここでGoogle Chromeに拡張機能[HTTP/2 and SPDY indicator ]を導入し、今現在のhttpプロトコルの現状を確認してみましょう。導入すると、Google Chromeの右上に、新しく雷のマークが出ていると思います。
ここが
- グレイ ⇒ HTTP/1.1
- 青 ⇒ HTTP/2
- 赤/グリーン ⇒ QUIC・SPDY
となるので、このマークが青になるまでやってみましょう。
6.SSLの設定
SSL設定は、弊社の下記記事を参考に導入します。
今回はnginxを利用するので、–nginxの引数を入力し、SSL証明書を取得しましょう。
# apt-get install git # cd /usr/local/src # git clone https://github.com/certbot/certbot # cd certbot/ # ./certbot-auto --nginx -d [ドメイン] ~ ~ Enter email address (used for urgent renewal and security notices) (Enter 'c' to cancel):連絡用のメールアドレスを入力し、次に進みます。
------------------------------------------------------------------------------- Please read the Terms of Service at https://letsencrypt.org/documents/LE-SA-v1.1.1-August-1-2016.pdf. You must agree in order to register with the ACME server at https://acme-v01.api.letsencrypt.org/directory ------------------------------------------------------------------------------- (A)gree/(C)ancel:利用規約を確認し、Aを入力しましょう。
Please choose whether HTTPS access is required or optional. ------------------------------------------------------------------------------- 1: Easy - Allow both HTTP and HTTPS access to these sites 2: Secure - Make all requests redirect to secure HTTPS access ------------------------------------------------------------------------------- Select the appropriate number [1-2] then [enter] (press 'c' to cancel):HTTPをHTTPSにリダイレクトさせたいかどうかですが、今回はHTTP/2を常に利用したいので、2を入力しましょう。
------------------------------------------------------------------------------- Congratulations! You have successfully enabled https://[ドメイン] You should test your configuration at: https://www.ssllabs.com/ssltest/analyze.html?d=[ドメイン] ------------------------------------------------------------------------------- IMPORTANT NOTES: - Congratulations! Your certificate and chain have been saved at /etc/letsencrypt/live/[ドメイン]fullchain.pem. Your cert will expire on 2017-05-06. To obtain a new or tweaked version of this certificate in the future, simply run certbot-auto again with the "certonly" option. To non-interactively renew *all* of your certificates, run "certbot-auto renew" - If you lose your account credentials, you can recover through e-mails sent to [メールアドレス]. - Your account credentials have been saved in your Certbot configuration directory at /etc/letsencrypt. You should make a secure backup of this folder now. This configuration directory will also contain certificates and private keys obtained by Certbot so making regular backups of this folder is ideal. - If you like Certbot, please consider supporting our work by: Donating to ISRG / Let's Encrypt: https://letsencrypt.org/donate Donating to EFF: https://eff.org/donate-leこれでSSL設定がおわりました!
どう変わったか、設定ファイルを見てみましょう。
# cat /etc/nginx/conf.d/http2.conf server { listen 80; server_name [ドメイン]; access_log /var/log/nginx/http2.access.log; error_log /var/log/nginx/http2.error.log; location / { root /var/www/http2; index index.html index.htm; } listen 443 ssl; # managed by Certbot ssl_certificate /etc/letsencrypt/live/[ドメイン]/fullchain.pem; # managed by Certbot ssl_certificate_key /etc/letsencrypt/live/[ドメイン]/privkey.pem; # managed by Certbot ssl_session_cache shared:le_nginx_SSL:1m; # managed by Certbot ssl_session_timeout 1440m; # managed by Certbot ssl_protocols TLSv1 TLSv1.1 TLSv1.2; # managed by Certbot ssl_prefer_server_ciphers on; # managed by Certbot ssl_ciphers "ECDHE-ECDSA-AES128-GCM-SHA256 ECDHE-ECDSA-AES256-GCM-SHA384 ECDHE-ECDSA-AES128-SHA ECDHE-ECDSA-AES256-SHA ECDHE-ECDSA-AES128-SHA256 ECDHE-ECDSA-AES256-SHA384 ECDHE-RSA-AES128-GCM-SHA256 ECDHE-RSA-AES256-GCM-SHA384 ECDHE-RSA-AES128-SHA ECDHE-RSA-AES128-SHA256 ECDHE-RSA-AES256-SHA384 DHE-RSA-AES128-GCM-SHA256 DHE-RSA-AES256-GCM-SHA384 DHE-RSA-AES128-SHA DHE-RSA-AES256-SHA DHE-RSA-AES128-SHA256 DHE-RSA-AES256-SHA256 EDH-RSA-DES-CBC3-SHA"; # managed by Certbot if ($scheme != "https") { return 301 https://$host$request_uri; } # managed by Certbot }先ほど作ったバーチャルホストの設定に、cerbotが自動でSSL設定を追記してくれています。
では、nginxを再起動して、ページをリロードして見てみましょう。
# nginx -t nginx: the configuration file /etc/nginx/nginx.conf syntax is ok nginx: configuration file /etc/nginx/nginx.conf test is successful # service nginx restart
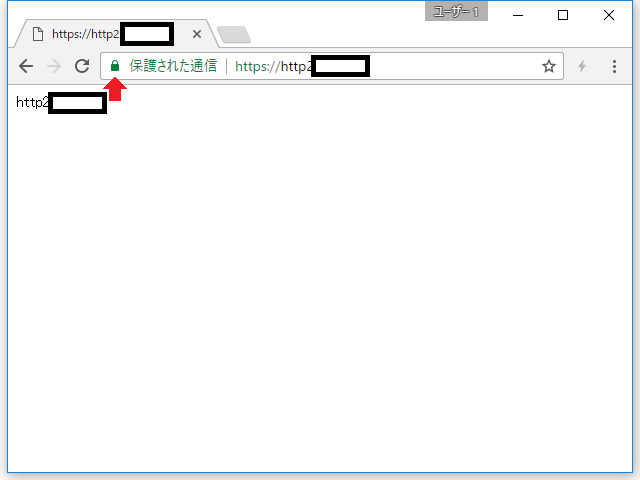
無事、鍵マーク付きのページになり、SSLで見れることが確認できました。
ですが、まだHTTP/2の表示は出ていません。
8.HTTP/2の設定
では、nginxにHTTP/2の設定を追記します。
# cp -ip /etc/nginx/conf.d/http2.conf /etc/nginx/conf.d/http2.conf.20170206 # vi /etc/nginx/conf.d/http2.conf # diff /etc/nginx/conf.d/http2.conf /etc/nginx/conf.d/http2.conf.20170206 13c13 < listen 443 ssl http2; # managed by Certbot --- > listen 443 ssl; # managed by Certbot追記したのは、「listen 443 ssl」の横に、「http2」と書くだけです。
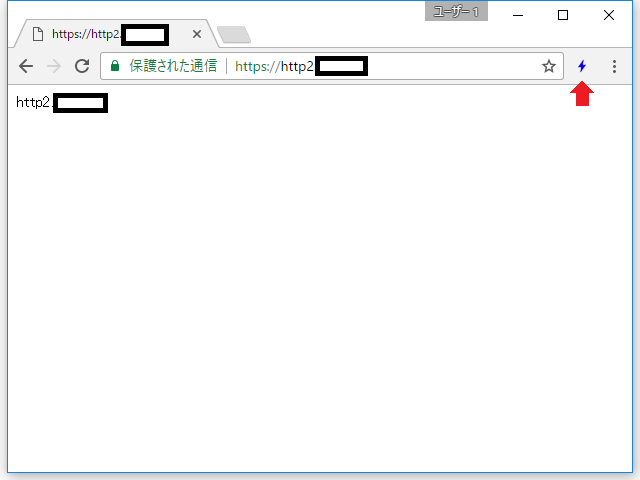
早速、nginxを再起動して、今度はスーパーリロード(Ctrl+F5)してみましょう。
# nginx -t nginx: the configuration file /etc/nginx/nginx.conf syntax is ok nginx: configuration file /etc/nginx/nginx.conf test is successful # service nginx restart
素晴らしい!
これでHTTP/2でページが見れるようになりました。
9.最後に
いかがだったでしょうか?まだセキュリティの設定などは必要ですが、意外な程簡単に、HTTP/2のWEBサーバーが構築出来たと思います。
ご存知かと思いますが、このHTTP/2はGoogleのSPDYが元となっており、またGoogleは2014年に「HTTPS をランキング シグナルに使用します」と発表し、より信頼が出来るサイトを検索結果の上位に表示させています。
その為、もしかするとHTTP/2もGoogleのページランクに関係するかも・・・と思い、今回HTTP/2の話題を取り上げさせて貰いました。
また今回、パッケージインストールの為Apacheではなくnginxを利用しましたが、勿論弊社ではApacheのソースビルド・運用の実績もございますので、お気軽にお問い合わせください。
最後までお読みくださり、有難うございました。