



前回は、自宅の Windows PC より、WireGuard の VPN 経由でクラウドのサーバへのアクセスができるまでを確認しました。
さくらのクラウドで WireGuard を試してみた(前編)
今回はその続きで、下記を確認していきます。
- 自宅の Linuxサーバから VPNルータに WireGuard で接続してクラウドサーバにアクセス
- VPNルータに接続した自宅の Linuxサーバで NAPT を設定してゲートウェイ化し、自宅の別の Linuxサーバからクラウドサーバにアクセス
利用する環境
利用するネットワーク環境は、前回作成/設定したものをそのまま利用します。
全体構成を再掲します。
| 自宅ネットワーク: 192.168.1.0/24 クラウド側ネットワーク: 10.0.1.0/24 |
クラウド側ネットワークの IPアドレスは下記のように割り当てます。
| VPNルータ 10.0.1.1 (デフォルトGW) クラウドサーバ1 10.0.1.2 |
自宅ネットワークのサーバの IPアドレスは下記のように割り当てます。
| ブロードバンドルータ 192.168.1.1 (デフォルトGW) 自宅GWサーバ 192.168.1.100 (VPNルータ接続GW) 自宅サーバ1 192.168.1.101 |
また、WireGuard のピアがトンネル内で使用する IPアドレスの範囲と、各ピアへの IPアドレスを下記のように割り当てます。
| ピアの IPアドレス範囲 172.16.1.0/24 VPNルータ 172.16.1.1 自宅PC 172.16.1.2 自宅GWサーバ 172.16.1.3 |
自宅 Linux サーバの用意
ここで、今回使用する、下記の2つの Linux サーバを適宜、用意します。
- 自宅GWサーバ : WireGuard をインストールして、VPNルータへの Gateway サーバにします。
- 自宅サーバ1 : 自宅GWサーバを経由したクラウド側との通信の確認に使用します。
OS は AlmaLinux 9 を使用します。既に OS のインストールは終わって、下記が設定されているものとします。
| ・デフォルトGW 設定 (192.168.1.1) ・ローカルのIPアドレス割り当て 自宅GWサーバ 192.168.1.100 自宅サーバ1 192.168.1.101 ・SELinux 無効化 ・firewalld 無効化 |
自宅GWサーバに WireGuard ツールを導入
自宅GWサーバに WireGuard のツールをインストールします。
[root@gateway ~]# dnf install wireguard-tools使用するツールは wg コマンドです。これを使って、秘密鍵、公開鍵を作成します。
秘密鍵を作成します。
[root@gateway ~]# wg genkey > private
Warning: writing to world accessible file.
Consider setting the umask to 077 and trying again.
[root@gateway ~]#
作成した秘密鍵を確認します(鍵の内容はマスクしています)。
[root@gateway ~]# cat private
ODq######################################0w=
[root@gateway ~]#
秘密鍵に対する公開鍵を確認します(鍵の内容はマスクしています)。
[root@gateway ~]# wg pubkey < private
8Px######################################wY=
[root@gateway ~]#
なお、実際に運用する際は鍵の管理に注意してください。
VPNルータへ WireGuard のピアを設定
さくらのクラウド画面で、VPNルータに自宅GWサーバの WireGuard 接続を設定します。
VPNルータは前回に作成したものを引き続き使用します。
- 「アプライアンス」=>「VPNルータ」
- 「VPNルータ1」をダブルクリック
- 「リモートアクセス」タブ→「WireGuardサーバ」タブを選択します。
- 「WireGuardピア」の下の「追加」ボタンをクリック
ピア追加設定画面が表示されます。下記を入力します。
| 名前 自宅GWサーバ IPアドレス 172.16.1.3 公開鍵 (自宅GWサーバで作成した公開鍵) |
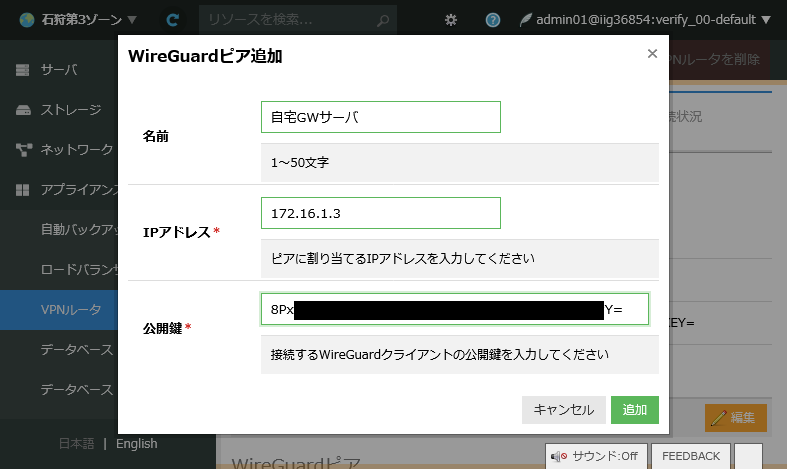
「追加」ボタンを押した後、「反映」ボタンをクリックし、VPNルータ側への設定内容の反映します。
自宅GWサーバの WireGuard 設定
自宅GWサーバの WireGuard 設定をおこないます。
よくあるのは wg-quick の設定ファイルを使った設定ですが、最近の RedHat 系の OS では WireGuard の設定をNetworkManager のインタフェース設定に直接書けるため、そちらを利用します。
nmcli コマンドで、WireGuard 接続プロファイルを作成します。
[root@gateway ~]# nmcli connection add type wireguard con-name wg0 ifname wg0 autoconnect yes
Connection 'wg0' (69cf5853-17d4-4ef8-8d6d-d1a0544b4cbf) successfully added.
[root@gateway ~]#
なお、サーバ起動時に自動接続しない場合は autoconnect を no に設定します。
トンネルの IPアドレスおよびサブネットマスクを設定します。
[root@gateway ~]# nmcli connection modify wg0 ipv4.method manual ipv4.addresses 172.16.1.3/32WireGuard のトンネルは PtoP 接続のため、インタフェースに設定する IPアドレスのプリフィックスは /32 にします。
自宅GWサーバの秘密鍵を接続プロファイルに設定します(鍵の内容はマスクしています)。
[root@gateway ~]# nmcli connection modify wg0 wireguard.private-key "ODq######################################0w="自宅GWサーバの WireGuard 接続のポートを設定します。
[root@gateway ~]# nmcli connection modify wg0 wireguard.listen-port 51820VPNルータ側のピア設定を追加します。
これらの設定は、NetworkManager の keyfile を手動で直接編集します。
[root@gateway ~]# vi /etc/NetworkManager/system-connections/wg0.nmconnection下記を追記します。
| [wireguard-peer.(WireGuardサーバの公開鍵)] allowed-ips=172.16.1.0/24;10.0.1.0/24; endpoint=(VPNルータのグローバルIPアドレス):51820 persistent-keepalive=25 |
[wireguard-peer.C6N######################################EY=]
allowed-ips=172.16.1.0/24;10.0.1.0/24;
endpoint=133.###.###.###:51820
persistent-keepalive=25
前回も説明しましたが、allowed-ips に「172.16.1.0/24」と「10.0.1.0/24」が入っていることに注意します。前者は WireGuard のトンネルで使用するピアの IPアドレス範囲、後者はクラウド側のローカルネットワークのサブネットです。この設定をおこなうことで、自宅GWサーバとクラウド側のローカルネットワークのサーバとの間で通信をおこなうことができます。
wg0 接続プロファイルをリロードします。
[root@gateway ~]# nmcli connection load /etc/NetworkManager/system-connections/wg0.nmconnectionwg0 接続を再アクティブ化します。
[root@gateway ~]# nmcli connection up wg0
Connection successfully activated (D-Bus active path: /org/freedesktop/NetworkManager/ActiveConnection/5)
[root@gateway ~]#
WireGuard 接続の確認
自宅GWサーバの WireGuard インタフェース wg0 が正常に認識されていることを確認します。
[root@gateway ~]# nmcli connection
NAME    UUID                                  TYPE       DEVICE
enp1s0  fc662483-4f19-42c2-b2c4-35922bbdd054  ethernet   enp1s0
wg0     69cf5853-17d4-4ef8-8d6d-d1a0544b4cbf  wireguard  wg0
lo      d3245ab8-ebd1-4747-bb29-6eb537504e45  loopback   lo
[root@gateway ~]#
wg0 のインタフェース状況を確認します。
[root@gateway ~]# ip addr show wg0
4: wg0: <POINTOPOINT,NOARP,UP,LOWER_UP> mtu 1420 qdisc noqueue state UNKNOWN group default qlen 1000
    link/none
    inet 172.16.1.3/32 scope global noprefixroute wg0
       valid_lft forever preferred_lft forever
[root@gateway ~]#
トンネル内の IP アドレス 172.16.1.3 が設定されていて、正常に UP しています。
WireGuard のポートの待ち受け状態を確認します。
[root@gateway ~]# ss -lunp
State    Recv-Q   Send-Q     Local Address:Port       Peer Address:Port   Process
UNCONN   0        0                0.0.0.0:51820           0.0.0.0:*
UNCONN   0        0              127.0.0.1:323             0.0.0.0:*       users:(("chronyd",pid=559,fd=5))
UNCONN   0        0                   [::]:51820              [::]:*
UNCONN   0        0                  [::1]:323                [::]:*       users:(("chronyd",pid=559,fd=6))
[root@gateway ~]#
UDP のポート 51820 で待ち受けています。
ルーティングテーブルを確認します。
[root@gateway ~]# ip route show
default via 192.168.1.1 dev enp1s0 proto static metric 100
10.0.1.0/24 dev wg0 proto static scope link metric 50
172.16.1.0/24 dev wg0 proto static scope link metric 50
192.168.1.0/24 dev enp1s0 proto kernel scope link src 192.168.1.100 metric 100
[root@gateway ~]#
allowed-ips で指定したサブネットワーク 172.16.1.0/24、10.0.1.0/24 に対して wg0 インタフェースへのルーティングが自動的に設定されています。
wg コマンドで WireGuard のステータスを確認します。
[root@gateway ~]# wg
interface: wg0
  public key: 8Px######################################wY=
  private key: (hidden)
  listening port: 51820

peer: C6N#######################################EY=
  endpoint: 133.###.###.###:51820
  allowed ips: 172.16.1.0/24, 10.0.1.0/24
  latest handshake: 10 seconds ago
  transfer: 184 B received, 520 B sent
  persistent keepalive: every 25 seconds
[root@gateway ~]#
NetworkManager のインタフェースでおこなった設定が反映されていることを確認できます。
また、ピアとの間でハンドシェークしてからの経過時間と、送受信データ量もここで確認できます。
自宅GWサーバからクラウドサーバへのアクセス確認
自宅GWサーバで、VPNルータ側のピアに対して ping 疎通確認します。
[root@gateway ~]# ping -c 3 172.16.1.1
PING 172.16.1.1 (172.16.1.1) 56(84) bytes of data.
64 bytes from 172.16.1.1: icmp_seq=1 ttl=64 time=24.8 ms
64 bytes from 172.16.1.1: icmp_seq=2 ttl=64 time=25.0 ms
64 bytes from 172.16.1.1: icmp_seq=3 ttl=64 time=25.5 ms

--- 172.16.1.1 ping statistics ---
3 packets transmitted, 3 received, 0% packet loss, time 2003ms
rtt min/avg/max/mdev = 24.801/25.119/25.514/0.296 ms
[root@gateway ~]#
クラウドサーバへの疎通も ping で確認します。
[root@gateway ~]# ping -c 3 10.0.1.2
PING 10.0.1.2 (10.0.1.2) 56(84) bytes of data.
64 bytes from 10.0.1.2: icmp_seq=1 ttl=63 time=25.7 ms
64 bytes from 10.0.1.2: icmp_seq=2 ttl=63 time=25.5 ms
64 bytes from 10.0.1.2: icmp_seq=3 ttl=63 time=25.5 ms

--- 10.0.1.2 ping statistics ---
3 packets transmitted, 3 received, 0% packet loss, time 2003ms
rtt min/avg/max/mdev = 25.496/25.587/25.744/0.111 ms
[root@gateway ~]#
クラウドサーバにログインできるか確認します。
[root@gateway ~]# ssh root@10.0.1.2
The authenticity of host '10.0.1.2 (10.0.1.2)' can't be established.
ED25519 key fingerprint is SHA256:############################################
This key is not known by any other names
Are you sure you want to continue connecting (yes/no/[fingerprint])? yes
Warning: Permanently added '10.0.1.2' (ED25519) to the list of known hosts.
root@10.0.1.2's password:
Last login: Thu Jul  9 16:10:50 2026 from 172.16.1.2
[root@host01 ~]#

[root@host01 ~]# exit
logout
Connection to 10.0.1.2 closed.
[root@gateway ~]#
自宅GWサーバからクラウドサーバへ問題なくログインできました。
自宅GWサーバのゲートウェイとしての設定
自宅GWサーバをクラウド側ネットワークへのゲートウェイにできるようにします。
自宅GWサーバが受けたパケットを WireGuad へ転送できるように、パケットの転送を許可設定します。
[root@gateway ~]# echo 'net.ipv4.ip_forward = 1' > /etc/sysctl.d/10-sysctl-local.conf
[root@gateway ~]# sysctl -p /etc/sysctl.d/10-sysctl-local.conf
net.ipv4.ip_forward = 1
[root@gateway ~]#
自宅GWサーバがローカルネットワークに接続しているインタフェースは enp1s0 です。
[root@gateway ~]# ip addr show enp1s0
2: enp1s0: <BROADCAST,MULTICAST,UP,LOWER_UP> mtu 1500 qdisc fq_codel state UP group default qlen 1000
    link/ether 52:54:00:20:4c:b6 brd ff:ff:ff:ff:ff:ff
    inet 192.168.1.100/24 brd 192.168.1.255 scope global noprefixroute enp1s0
       valid_lft forever preferred_lft forever
[root@gateway ~]#
NAPT をおこなうために nftables の設定を作成します。
ローカルネットワークの他のサーバから受けたパケットは enp1s0 で受信するので、そこから WireGuard のインタフェース wg0 へ転送するパケットに対して、NAPT (IP masquerade) をおこなうように設定します。
[root@gateway ~]# vi /etc/nftables/nat-wg.nft下記の内容を記述します
flush ruleset
table ip nftables_svc {
    chain POSTROUTING {
        type nat hook postrouting priority srcnat + 20
        policy accept

        meta iif enp1s0 oifname wg0 masquerade
    }
}
上記の設定ファイルを nftables が参照するようにします。
[root@gateway ~]# echo 'include "/etc/nftables/nat-wg.nft"' >> /etc/sysconfig/nftables.confnftables を起動し、自動起動を有効にします。
[root@gateway ~]# systemctl start nftables
[root@gateway ~]# systemctl enable nftables
Created symlink /etc/systemd/system/multi-user.target.wants/nftables.service → /usr/lib/systemd/system/nftables.service.
[root@gateway ~]#
nat の設定が有効になっていることを確認します。
[root@gateway ~]# nft list ruleset
table ip nftables_svc {
        chain POSTROUTING {
                type nat hook postrouting priority 120; policy accept;
                iif "enp1s0" oifname "wg0" masquerade
        }
}
[root@gateway ~]#
自宅サーバ1からクラウドサーバにログインしてみる
最後に、自宅サーバ1から自宅GWサーバ経由でクラウドサーバに接続してみます。
自宅GWサーバがクラウドサーバに接続できることは既に確認しました。パケットのフォワードと NAPT も設定しています。このため、自宅サーバ1のルーティングでクラウド側ネットワークへの接続時に自宅GWサーバを経由するようにすれば、自宅サーバ1からクラウドサーバにアクセスできます。
自宅サーバ1にログインします。
ローカルネットワークに接続しているインタフェースは enp1s0 です。
[root@server1 ~]# ip addr show enp1s0
2: enp1s0: <BROADCAST,MULTICAST,UP,LOWER_UP> mtu 1500 qdisc fq_codel state UP group default qlen 1000
    link/ether 52:54:00:8b:b9:9e brd ff:ff:ff:ff:ff:ff
    inet 192.168.1.101/24 brd 192.168.1.255 scope global noprefixroute enp1s0
       valid_lft forever preferred_lft forever
[root@server1 ~]#
enp1s0 に対して、クラウド側ネットワーク(10.0.1.0/24)へのルーティングを追加します。
ネクストホップは自宅GWサーバ(192.168.1.100)です。
[root@server1 ~]# nmcli connection modify enp1s0 +ipv4.routes "10.0.1.0/24 192.168.1.100"ルーティングの設定を反映します。
[root@server1 ~]# nmcli connection up enp1s0
Connection successfully activated (D-Bus active path: /org/freedesktop/NetworkManager/ActiveConnection/3)
[root@server1 ~]#
ルーティングを確認します。
[root@server1 ~]# ip route show
default via 192.168.1.1 dev enp1s0 proto static metric 100
10.0.1.0/24 via 192.168.1.100 dev enp1s0 proto static metric 100
192.168.1.0/24 dev enp1s0 proto kernel scope link src 192.168.1.101 metric 100
[root@server1 ~]#
クラウド側ネットワーク 10.0.1.0/24 にへのパケットは、enp1s0 インタフェースを通じて自宅GWサーバ 192.168.1.100 に転送されるようになっています。
クラウドサーバに ping で疎通を確認します。
[root@server1 ~]# ping -c 3 10.0.1.2
PING 10.0.1.2 (10.0.1.2) 56(84) bytes of data.
64 bytes from 10.0.1.2: icmp_seq=1 ttl=62 time=25.8 ms
64 bytes from 10.0.1.2: icmp_seq=2 ttl=62 time=28.3 ms
64 bytes from 10.0.1.2: icmp_seq=3 ttl=62 time=25.6 ms

--- 10.0.1.2 ping statistics ---
3 packets transmitted, 3 received, 0% packet loss, time 2003ms
rtt min/avg/max/mdev = 25.586/26.556/28.300/1.235 ms
[root@server1 ~]#
クラウドサーバから自宅サーバ1に ping が返ってきました。
クラウドサーバにログインしてみます。
[root@server1 ~]# ssh root@10.0.1.2
The authenticity of host '10.0.1.2 (10.0.1.2)' can't be established.
ED25519 key fingerprint is SHA256:############################################
This key is not known by any other names
Are you sure you want to continue connecting (yes/no/[fingerprint])? yes
Warning: Permanently added '10.0.1.2' (ED25519) to the list of known hosts.
root@10.0.1.2's password:
Last login: Thu Jul  9 16:40:27 2026 from 172.16.1.3
[root@host01 ~]#
自宅サーバ1からクラウドサーバにログインできました。
まとめ
2回にわたって、VPNルータの「WireGuardサーバ機能」を使って自宅からクラウドのネットワークへのアクセスを確認しました。
L2TP/IPsec では PSK とユーザID、パスワードで認証するのが一般的であるのに対し、WireGuard は公開鍵で認証する違いがあります。
WireGuard 自体は本来、設定さえおこなえばサイト間VPNとしての通信ができるのですが、残念ながら「WireGuardサーバ機能」ではクラウドと接続元の間でネットワーク間の VPN接続をおこなうことはできません。このため、NAPT を使うことで接続元の自宅からクラウドに対しては接続できるようにしてみました。
WireGuard は Linux カーネルにも組み込まれており、ネットワークインタフェースの設定は NetworkManager の設定ファイルを使用できます。ルーティングも接続時に自動的におこなってくれます。設定項目も多くなく複雑でもないことから、容易に VPN を構築できます。
プロトコルは UDP を使用しているため、ブロードバンドルータ上の NAT で UDP のセッションがタイムアウトすると
通信に支障が発生する可能性があります。このため、PersistentKeepAlive は設定しておくのがよいです。
皆様のご参考の一助になれば幸いです。
それでは楽しいインターネットライフを!
この記事を書いた人